Japan Trip — 2023
December 2023
- travel
- japan
- guide
Originally published on Medium: Japan Trip — 2023
More recently I took a long 18-day vacation to Japan in December 2023. Multiple friends asked me for trip recommendations, so in the interest of saving time and sharing, I decided to make this post for anyone interested in traveling to Japan.
I am, by no means, a Japan travel expert. When I came to Japan I had little information. If you’re worried or overwhelmed by planning a trip, I promise you there are ample things to do in Japan, and the most fun experience is just walking around and exploring different areas.
My vacation travel style for this trip was mainly focused on sightseeing and exploring, so I will mainly be giving recommendations for places to visit and not going into too much detail. This guide will also cover trip prerequisites.
My Trip Itinerary
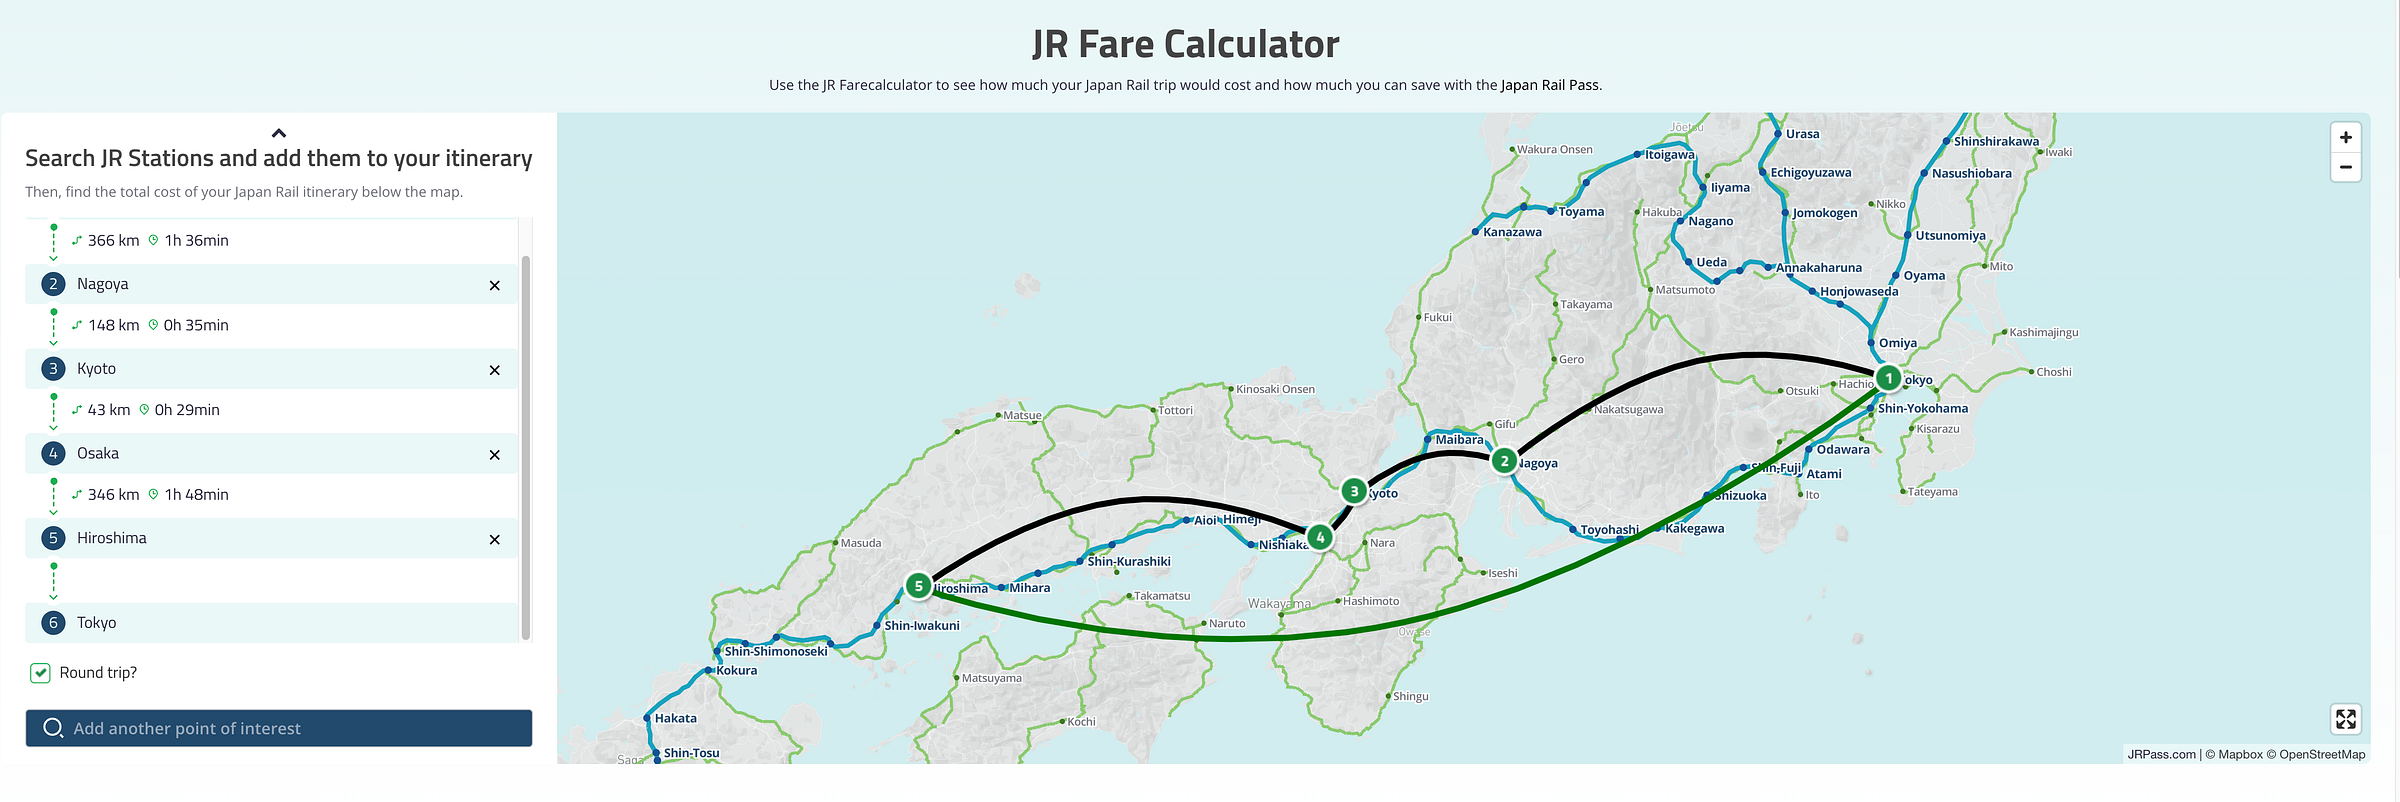
Route: Tokyo -> Nagoya -> Osaka -> Hiroshima -> Kyoto -> Tokyo
For my trip, I went to 5 different main cities. I flew in from Haneda Airport in Tokyo, made my way west, and then came back to Tokyo to fly out. I will split these cities into different segments and describe what I did in each of these locations. But first, let’s go over the trip prerequisites.
Trip Prerequisites
I will split the trip prerequisites into a few categories: visa entry, transportation, common Japanese phrases, travel packing, and other suggestions.
Visa Entry
To enter Japan you’ll need to fill out two forms. You don’t need to really worry about filling out these forms before you enter Japan. They can be filled out on the airplane coming into Japan, and the flight attendants should give you forms to complete when you get to Japan. If you do want to get a head start, you can fill out two entry forms here: https://vjw-lp.digital.go.jp/en/
The advantage of doing this method is that when going to shops that advertise “Japan Tax-Free,” you can show them the QR code given on the website instead of needing to show your passport to the vendor. If you use this method, make sure to screenshot your QR codes as it may be difficult to get a cellular or wifi connection when you first arrive.
Transportation
The best part about Japan is its public transportation system. You have two options when traveling to Japan: you can either get a transit card that you constantly reload with money or get the JR Rail pass.
JR Pass:
I won’t go into detail about the JR Rail pass because I did not use it. It was not economical for me to use it as they recently increased their prices. The idea behind the JR Rail Pass card is that you can pay upfront and get unlimited train rides for a set period (7, 14, and 21 days) on JR trains. If you’d like to see if it’s worth using, use this website to check: https://www.jrpass.com/farecalculator/
Suica Card (Transit Card):
When you arrive in Japan you can get a Suica card at the major airports. There is usually a kiosk at the airport where you can get this Suica card. Due to recent chip shortages the only card available at the time of my arrival was the “Welcome Suica Card,” which was only active for 30 days. I believe they are reopening the regular Suica cards; you will need to research where to get this card on arrival because the availability of these cards is always changing. This Suica card will work for all buses and trains in Japan (besides the bullet trains). It will even work at a lot of vending machines and some convenience stores. If you get the physical Suica card, you will need to reload the card with cash at kiosks at train stations near the entrance gates. Keep in mind that the physical Suica cards can only be refilled with cash. You’ll quickly find out that Japan is very much still a cash-based society.
If you fly out of Osaka or any other airport in Japan, there is usually a Suica card equivalent. It won’t be named Suica, and in fact in Tokyo there are two cards that the Tokyo airports give out (Suica and Pasmo). These cards will have different names, but they all work the same. If you get the transit card in Osaka it’ll work in Tokyo and vice-versa.
There is still one more option with the Suica card: if you have an iPhone you can add the Suica card to your Apple Wallet (just search for Suica in the Wallet app to add). I actually used this method, although there is a warning: you won’t be able to order shinkansen (bullet train) tickets at the self-service kiosks. You’ll need to go up to the counter and order one with the help of a representative, or order online. The advantage of using this method was that I could refill the card with a credit card. However, another warning: reloading with VISA may not work. I would make sure you have a Master Card and avoid the headaches of not being able to reload your card with Apple Pay. My VISA card also did not work when buying Shinkansen tickets online.
When you finally have your transit card, you’ll have to wirelessly tap your card on entry and exit from the train stations. They will calculate your fare based on where you started and ended. Buses will only be a one-time fee (at least from the ones I rode).
Lastly, you can also buy physical tickets if you know which stations you want to get on and off of, although this is very tedious and time-consuming.
Shinkansen Tickets (Bullet Trains)
When traveling between cities, you’ll want to take the Shinkansen. I found it a little confusing to use at first, but it’s not that hard to understand.
There are three ways you can order Shinkansen tickets:
- Order at the counter with the help of a representative.
- Order at a self-serve kiosk with your transit card.
- Order online.
If you’re anything like me, I always found myself ordering a ticket at the counter when I needed it. All of the representatives I talked to knew English well enough for me to order my tickets. Since I used the Suica Apple Wallet card and I did not have a Master Card to order tickets online, this was the only option available to me.
If you have a physical transit card, you can purchase your train ticket at a self-service kiosk with a credit card or cash.
If you want to order ahead of time, I heard that you can get discounted tickets if you order a few days in advance when you purchase online. Although you can also order on the same day as well. I could not get this method to work because my VISA cards did not work with the website, although they worked when at the counter. If you order online, you’ll be given a QR code and you’ll be able to use it at the entrance gate or go to a self-serve kiosk to print off regular tickets. Here’s the website to purchase online: https://smart-ex.jp/en/lp/app/
Additionally, if you have the Apple Wallet Suica card and want to order online you’ll need your card number; you can find your card number by downloading the Suica app and hitting the information icon (i).
Once you get your tickets, you’ll take the shorter ticket (if given two) with your train time and seat on it, and feed it into the entrance gates. And when you leave you’ll do the same thing. I did not try using a QR code, but that supposedly works too.
Common Japanese Phrases
When traveling to Japan there are a few common phrases you’ll want to know when ordering or getting help. Here are the words I used:
- Hai (yes, okay)
- Eei (no)
- Kore (this)
- Kore to Kore (this and this)
- Arigato (thank you)
- Arigato Gosaimasu (thank you very much)
- Kore, Kudasai (this please)
- Sumimasen (excuse me, I’m sorry)
I would suggest looking up the pronunciation of these phrases, as there are sometimes letters left out when pronouncing, and “R” is pronounced slightly differently than the English “R”.
Travel Packing
For travel packing, I would recommend packing as light as you think you can. A medium-sized check bag or a smaller one should be good. A lot of the hotels will allow you to store your luggage with them before check-in, and if you can’t get to your hotel right away there are coin lockers at most big train stations where you can store your luggage for about 500–700 yen a day. From memory, there were coin lockers at Tokyo, Osaka, Hiroshima, and Kyoto main stations.
Since you’re packing lightly you’ll probably need to do laundry; thankfully Japan has coin laundry places all over each city. You will not have a hard time finding a place to do laundry.
If you bring a medium-sized checked bag or larger, you’ll need to get special tickets on the Shinkansen trains with extra luggage room in the back. Carry-on luggage will fit stowed away above your head.
Cash
Japan is still very much a cash-based society. I would recommend finding a bank with no foreign withdrawal fees like a Charles Schwab checking account. You’ll find ATMs at almost every convenience store in Japan; I personally just used the ATMs at the 7/11s in Japan.
Tip: When withdrawing cash you’ll be prompted with whether you want to withdraw Yen or USD; always withdraw money with Yen or you will be subjected to the poor conversion rate of the ATM instead of your bank’s rate.
Walking
This might be silly to talk about, but you will be walking a lot in Japan. I was averaging about 10 miles a day. I would recommend getting good walking shoes and bringing some painkillers in case of injury.
On the first day, we walked 16 miles and I hurt my knee. I wouldn’t recommend doing this on the first day.
Travel Recommendations
There’s no need to do everything in the same order as I did; these are just general city recommendations. As a general rule of thumb, if you like nightlife and would like to be at a bar or club past midnight, I would strongly suggest getting hotels near the nightlife areas. Typically there are “foreigner-friendly” bars in each city; if you do a Google search you can find some online forum recommendations for bars.
Tokyo
I would recommend at least 4 days in Tokyo, more if possible. This is the largest city in the world and it is jammed pack with things to do.
Nightlife Areas: Shinjuku & Shibuya
Attractions to see:
- Meiji-Jinju and Yoyogi Park (https://www.japan-guide.com/e/e3006.html)
- Shinjuku Gyoen National Garden
- Imperial Palace
- Akihabara (Anime land & shopping center)
- Shibuya Scramble Crossing at night
- Tokyo Tower and/or Tokyo Skytree (Do one during the day and the other during the night)
- Golden Gai (nightlife bar area in Shinjuku, super fun if you make friends)
- Senso-ji Temple
- Tsukiji Outer Market
Nagoya
To be completely honest, we didn’t do much in Nagoya. We stayed here for one night and went to Inuyama Castle. I believe it was about a 40-minute train ride, and we chose to go to this castle instead of the Nagoya Castle because it was not rebuilt and was from the 16th century, making it the oldest castle in Japan.
You’ll notice a common theme in Nagoya and Tokyo: both were fire-bombed in WWII and many of the buildings were destroyed. The reconstructed shrines, temples, and buildings are cool to explore, but if you’re a history buff you’ll probably want to see Inuyama Castle.
Osaka
Osaka is the second largest city in Japan. I’d recommend at least 2 days here if you can.
Nightlife Area: Dotonbori
I don’t have particular recommendations for Osaka. I would recommend making a day trip out to Nara Park to feed the deer there. It’s a fun daytime trip. You can also see Nara Park if you are in Kyoto, but we chose to go when we were in Osaka.
We also went to the Osaka Aquarium & the Ferris Wheel right next to it. The aquarium was cool, but you can skip this if you find something more interesting.
Gojo
I also stayed one night in a rural area called Gojo city. It was definitely a very nice Airbnb-type place we stayed at. If you are at all interested in just experiencing the rural area life, you can try a town similar to Gojo but go visit a hot springs bath. It wasn’t quite my thing, so I’d skip this if I went again.
Hiroshima
I would recommend going to Hiroshima if you get the chance. Stay here for two days and spend the first day traveling to Hiroshima going to the Peace Museum and seeing the Atomic Dome Building. It was a surreal experience.
The next day I would recommend visiting the Island of Miyajima. You take a train from Hiroshima and then ferry your way over. To get entry on the ferry you can use your transit card.
I’d recommend taking the gondola lift to an observation deck near the top of the island. This was probably the most scenic spot of my trip, and I really enjoyed it. The Ishidatami Shrine is also very neat to see at high tide (you might want to check when high tide is). The five-storied Pagoda from the 1400s is also a must-see on the island.
Kyoto
Kyoto is a city of cultural importance to Japan and holds lots of important shrines and temples. I would recommend staying here for at least 3 days. Kyoto was the city where I saw the most tourists, as the attractions here are quite popular.
There is only one night-time area in Kyoto, and it’s a street called Kiyamachi-dori. The common recommendation for nightlife in Kyoto is to go to Osaka.
Attractions to see:
- Kiyomizu-dera (cool building held by wooden beams with no nails)
- Nijō Castle (historical imperial palace location)
- Bamboo Forest (just cool to walk through, not much else)
- Fushimi Inari-Taisha Shrine (make sure to get here earlier or later, as there are a lot of tourists in this area)
There is a lot more to do in Kyoto, although these are the ones I would recommend.
Wrapping Up
After staying in Kyoto, I headed back to Tokyo and flew back to the States. I would highly recommend a direct flight to Japan if you’re coming from the States; it made everything so much easier.
If you have any more questions feel free to comment, and I hope you enjoy your stay!